Walleye Rigging Guide (With Pictures)
UPDATED 03 NOVEMBER 2023
by Robert Ceran
Walleye rigs are among the most powerful fishing tools you can use to catch walleye during the open water season.
Rigs are essential for presenting your bait at the right depth, and can be used either for trolling, casting, or stationary fishing.
They are also perfect for finesse tactics, since you can use them with live bait and fluorocarbon leaders that are almost invisible in water, which is essential for catching finicky walleye.
But which rig should you use? In this article we’ll give you a list of the 7 best walleye rigs, and discuss the pros and cons of each of them in full detail, so you can choose the best one for your purposes.
The top walleye fishing rigs you need to know
Here are the 7 most important rigs for walleye fishing:
- Bottom bouncer rig
- Lindy rig
- Drop shot rig
- Crawler harness
- Slip bobber rig
- Ned rig
- 3 way rig
If you’re a novice walleye angler, you might be a little confused by all the different rigs you can choose from.
But keep in mind that you’ll just need one of them in order to get started, and as you gain more experience, you’ll probably end up using just 2 or 3 of them, depending on your location, and the different tactics you’ll employ.
And in order to choose the optimal rigging for walleye that works best for you, it’s important to know the basics about all of them, so you can make an informed decision about which one is ideal for your circumstances.
Bottom bouncer rig for walleye
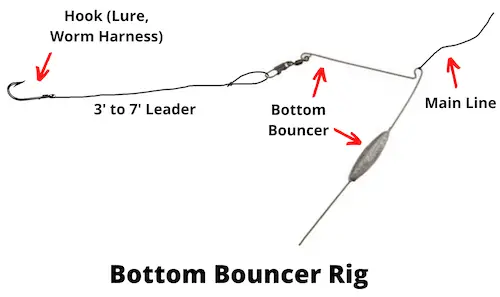
This is one of the most popular rigs for walleye fishing, and is especially useful for trolling. Essentially, it consists of an L-shaped wire that has a bullet weight in the middle of its long arm.
The advantage of this setup is that you can troll a bottom bouncer rig for walleye close to the bottom, with its wire end sticking down and making contact with the bottom regularly, while avoiding the weight getting snagged on rocks or other cover.
Depending on the length of the bottom bouncer wire, your bait will be presented about a foot above the bottom, which is an ideal depth to target walleye in many situations (since they often like to hold close to bottom structure).
Dr. Fish bottom bouncer

Our go-to bottom bouncer that comes in all sizes that you need for catching walleye.
How to tie it: tie your main line to the notch at the corner of the “L” of the bottom bouncer, by using a palomar knot or double uni knot. Then attach your leader to the other arm of the bottom bouncer by using the snap swivel that’s attached to it.
If you’re using a worm harness, you can attach that directly to the snap swivel, but if you’re using crankbaits or other lures, tie a 3 to 6 foot long leader with a loop at its end, and attach that to the snap swivel
When to use it: a bottom bouncer can be used any time when you know that the walleye are close to the bottom. It is most often used in summer, but you can also use it in spring or fall, and pretty much any time during the open water season.
The only time when bottom bouncers aren’t a good choice is if you know the walleye are suspended higher in the water column, in which case they won’t see your bait presentation underneath them.
How to use it: the most effective way to use a bottom bouncer is to troll it slowly to ensure regular bottom contact. That way you can cover a lot of ground in search of hungry walleye, and the great thing about this strategy is that you can use it with any live bait presentation (such as minnows, nightcrawlers, or leeches), or with artificial lures.
You can also cast a bottom bouncer rig from shore, and retrieve it slowly to ensure frequent bottom contact.
What size bottom bouncer should you use for walleye?
The size of the bottom bouncer weight depends on the depth of the water you’re fishing in. As a rule of thumb, you want to use 1 oz for every 10 feet of water depth.
So if you’re fishing in 25 feet of water, choose a 3 oz bottom bouncer weight to make sure your rig sinks all the way to the bottom.
Some bottom bouncers allow you to change the weight, which is very convenient if you’re fishing at different depths over the day.
Lindy rig for walleye
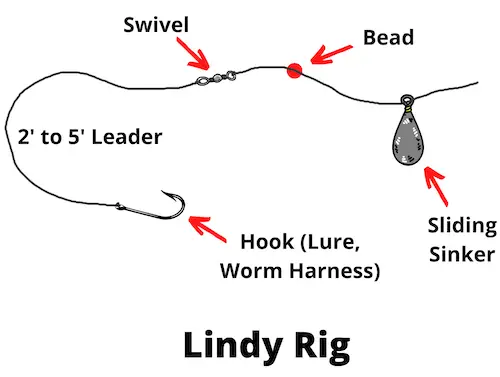
In many ways, a Lindy rig is a simpler version of the bottom bouncer rig. Instead of the L-shaped bottom bouncer wire, it simply consists of a sliding weight or sinker, and a leader attached by a swivel to the main line.
The swivel prevents the sinker from sliding on to the leader, and usually a bead is placed in between the sinker and the swivel, to avoid the sinker getting stuck on the swivel.
How to tie it: thread your main line through the sliding sinker and the plastic bead, and then tie it to a barrel swivel with a palomar or double uni knot. Then tie a 2 to 5 foot leader to your hook, worm harness, or lure, and tie the end of the leader to the second eye of the swivel.
When to use it: the best time to use a Lindy rig is if you know that the walleye are holding close to the bottom. Since a Lindy rig doesn’t have a wire like a bottom bouncer, your bait will be presented very close to the bottom, unless you use a floating lure.
The only disadvantage of this walleye setup is that the weight can easily get snagged on bottom structure (while a bottom bouncer is more snag proof).
How to use it: a Lindy rig is most commonly used for trolling, but you can also cast it from shore.
If you’re interested in using this walleye fishing setup, check out our in-depth article on the Lindy rig, where we go in to a lot more detail, and cover additional variants that can help to catch more fish.
Lindy rig vs bottom bouncer – which one should you use?
While both rigs can be used for the same purpose, they each have their pros and cons. The main advantage of a bottom bouncer is that it presents your bait one foot above the bottom, and is relatively snag proof, due to its wire design.
A Lindy rig, on the other hand, presents your bait even closer to the bottom than a bottom bouncer, but is also more prone to getting snagged, since you’re essentially dragging the weight right across the bottom.
Another advantage of the Lindy rig is that it allows a fish to pull line without feeling the weight of the sinker (since it’s a sliding sinker). So if you want to give the walleye more time to eat your bait, a Lindy rig is better for that.
If you’re interested in using another great bottom fishing rig for walleye, check out our article on the Carolina rig for walleye.
Drop shot rig for walleye
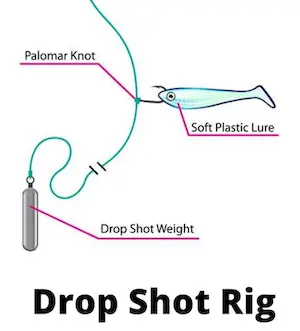
While most people associate the drop shot rig with bass fishing, it also works like gangbusters for catching walleye.
It’s a very simple walleye setup that consists of a drop shot weight tied to your main line, with a single hook tied 1 to 3 feet above the weight. The hook is then baited with any of a wide variety of soft plastic lures.
How to tie it: first tie your main line to a single octopus hook with a palomar knot. Make sure that the tag end is long enough to get about 2 to 3 feet of line between the hook and the weight.
If you’re not sure how to choose the right hook size for this, check out our article on what size hook is best for walleye?
After you tie the palomar knot, thread the tag end through the eye of the hook a second time, which will make it stick out perpendicular to the line. Then tie the tag end of the line to the drop shot weight.
The amount of line between the weight and the hook determines how far above the bottom your bait will be presented.
When to use it: it’s best to fish a drop shot rig when targeting walleye holding close to the bottom, which can be pretty much throughout the whole open water season.
On the other hand, if your fish finder tells you that the walleye are suspended, it’s better to target them with a jig.
How to use it: the most effective way to use a drop shot rig is for vertical fishing from a boat. Use your fish finder to find structures with walleye, and then lower your weight until it touches the bottom.
Then use subtle movements of your walleye jigging rod tip to wiggle the soft plastic lure without actually lifting the weight from the bottom.
Crawler harness for walleye
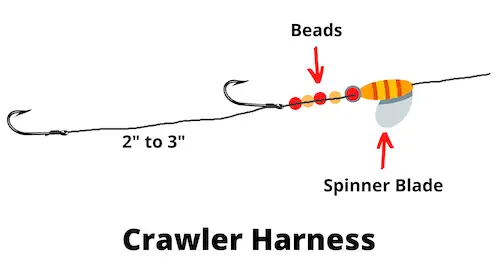
The crawler harness (sometimes referred to as a spinner rig) is a 2 hook setup used to hook a nightcrawler optimally at both ends. This stretches it out underwater, and makes it more attractive for walleye.
At the same time, it has a colorful spinner blade attached to the front, which serves to create vibrations and color flashes underwater that call in the walleye to investigate. Once they get close enough to see the worm, that’s often enough to trigger a bite.
A crawler harness is always used together with one of the other rigs (most often a bottom bouncer, but you can also use it with a lindy rig or 3 way rig).
How to tie it: while you can definitely tie your own crawler harnesses, we suggest getting them ready-made, since that will save you a lot of time.
When to use it: while crawlers are one of the best live baits for walleye, they only work during the summer months, since this is the only time of year that they occur naturally as a food source for walleye. That’s why you should only use a crawler harness from late spring to early fall.
How to use it: one of the most effective ways to fish a crawler harness is to combine it with a bottom bouncer, and then use slow trolling to present the worm close to the bottom, and cover a lot of ground that way.
Slip bobber rig for walleye
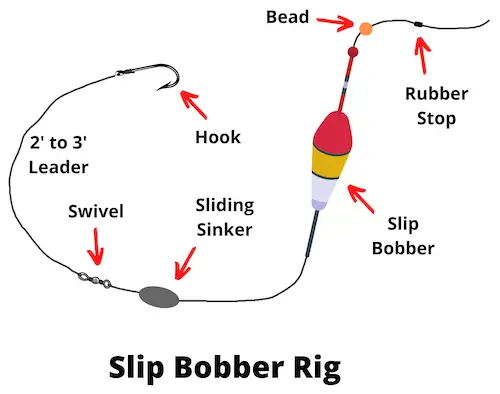
The slip bobber rig is another very popular option for walleye anglers. It consists of a slip bobber on your main line, which is attached to a swivel. The swivel, in turn is attached to a leader with your hook at the end of it.
Additional features are a sliding bullet weight (or optionally a big split shot) between the slip bobber and the swivel, as well as a rubber stop above the bobber.
The rubber stop determines how deep your bait will be presented, and it’s usually a good idea to place a bead between the rubber stop and the bobber.
How to tie it: thread your rubber stop onto your main line, followed by a bead and your slip bobber. Then thread on a sliding sinker that’s the right size for the bobber, and tie the line to a barrel swivel (with a palomar or double uni knot). Finally, tie a 2 to 3 foot leader to the other eye of the swivel, and tie your hook to the leader.
When to use it: a slip bobber rig can be used to catch walleye any time during the open water season from spring to fall, but keep in mind that it performs best in situations where you want to present your bait above the walleye.
It’s a great choice when walleye are feeding close to shore in relatively shallow water in spring or autumn, and you can cast it out to them.
How to use it: a slip bobber rig is one of the few rigs that works equally well from shore or from a boat. When you’re using it from a boat, it helps a lot if you can use a fish finder to find walleye, and to determine the depth at which they are holding.
Then adjust your rubber stop so that your bait will be presented 1 to 3 feet above that depth. If you lower your bait down to the fish, but don’t get a bite within one or two minutes, just move on to the next location. This is a great way to target suspended walleye in summer.
Ned rig for walleye
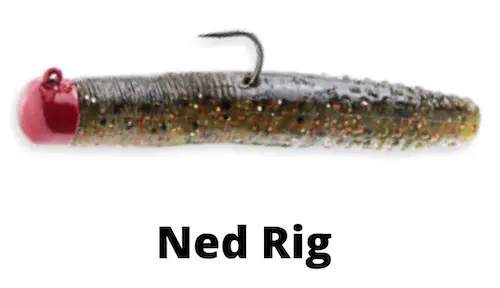
Z-Man finesse ned rig (image source)
The ned rig is another walleye rig setup that’s mostly associated with bass fishing, but it can be a killer option for catching walleye.
In fact, some bass pros complain that they catch too many walleye when throwing a ned rig, which reduces their chances of catching bass. Now that’s the kind of problem a walleye angler sure is glad to have!
This is the simplest rig to set up, since it just consists of a 1/16 to 1/4 oz mushroom jig head threaded with a short chunk of soft plastic lure on to the hook. The most common lure used for this is a 2 inch long thick plastic worm.
You might be asking, so what’s the difference between a ned rig and a plastic jig? The main difference is that the ned rig is designed to be fished with a thick, buoyant plastic tail, which points upwards during retrieval.
This gives it a very characteristic action underwater, and can entice fish to bite when other lures don’t work.
How to tie it: simply tie your main line to a mushroom jig head, and then thread a 2 inch soft plastic lure on to the hook, and you’re good to go.
When to use it: the ned rig is a great option for catching shallow water walleye, and is in fact one of the best options for fishing from shore. You can also use it on shallow mud flats, or to fish along the edges of weed beds.
How to use it: fishing this setup is very simple: simply cast it out and let it sink to the bottom, then start retrieving it slowly with periodic jerks or small hops. Try to experiment with retrieve speed, and depth, since sometimes walleye feed higher in the water column.
3 way rig for walleye
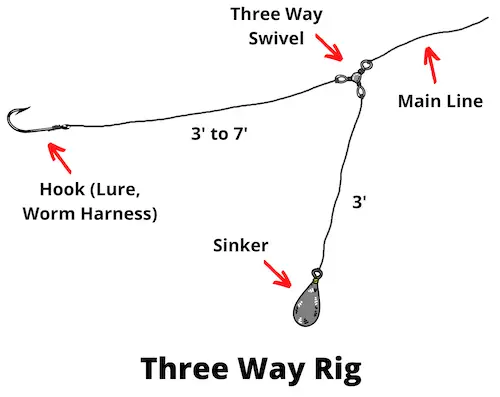
The 3 way rig is in many ways a hybrid between the bottom bouncer and lindy rig. It consists of a 3 way swivel that’s tied to two leaders: one with your hook on it, as well as a second one tied to a sinker.
This provides the advantage of being able to present your bait well off the bottom, which is great when walleye are active a few feet above the bottom.
How to tie it: tie your main line to a 3 way swivel. Then tie two leader to the other two eyes of the swivel. One of these should be 2 to 3 feet long, and is tied to the sinker.
The second one is 3 to 7 feet long, and is tied to your hook (or crawler harness or lure). The leader that is tied to the weight should be lower lb test, since that way you’ll only use the sinker if it gets snagged on the bottom.
When to use it: the 3 way rig is a great option when you’re trolling for walleye, and notice that they are suspended several feet above the bottom. You can adjust the length of the line attached to the weight, which controls the depth at which your bait is presented.
How to use it: one of the best ways to use the 3 way rig is for trolling. The great thing about this is that you can use it with either live bait or with artificial lures, so it’s incredibly versatile for trolling.
If you use it with floating lures, you can achieve a bait presentation that’s 4 feet above the bottom, which can be very effective in some situations.
What is the best rig for walleye fishing?
The 3 best rigs for walleye are:
- Ling rig (for bottom fishing)
- Bottom bouncer rig (for trolling)
- Slip bobber rig (for float fishing)
With that being said, you need to keep in mind that the answer depends heavily on your location, bait, and the fishing tactic you will be using.
So now let’s look at this topic in more detail, and discuss the main applications for different types of rigging for walleye.
Best live bait rig for walleye
The best walleye rigs for live bait are the slip bobber rig, bottom bouncer, and lindy rig.
Walleye minnow rig
For live minnows you can use either a bottom bouncer or lindy rig, but the slip bobber rig is often the best choice, as it provides the additional advantage of allowing you to adjust the depth at which you present your live bait in the water column.
During spring and summer, when walleye hunt actively in shallow water zones, the slip bobber rig is my favorite choice for fishing with live minnows, since you can adjust it to present the bait one or two feet above the walleye.
If you’re using minnows for walleye ice fishing, you can also go really simple, and just use them to bait a jig head, which is very easy to set up.
Worms and leeches
If you’re using a nightcrawler as live bait, thread the worm onto a crawler harness, and then attach the harness to a bottom bouncer or lindy rig. You can do the same with leeches, but personally I prefer to use a lindy rig or slip bobber rig with a leech.
Walleye rigs for trolling
The best rigs for walleye trolling are the bottom bouncer, lindy rig, and 3 way rig. All of these walleye setups are designed to enable you to present your bait or lure close to the bottom, while covering large areas trolling for walleye.
So which of these walleye trolling setups should you choose?
The lindy rig is the best choice for presenting your bait within a few inches of the bottom, while the bottom bouncer allows you to present it about a foot above the bottom.
The 3 way rig allows you to present the bait even higher, up to 4 feet above the bottom.
If you don’t know how deep the walleye are holding, you can run several of these rigs at the same time, to see which one you get the most bites on, and then switch all your rods to the best walleye rigging.
Walleye rigs for shore fishing
The best rigs for walleye shore fishing are the slip bobber rig, lindy rig, ned rig, and 3 way rig. Apart from the ned rig, each of these can be used as a stationary walleye shore fishing setup.
Just bait the hook with live bait, cast out, and wait for walleye to come to you. You can set up a whole bunch of rods that way, which increases your chances of catching fish.
In addition to these stationary presentations, you can also use the ned rig to cast actively from shore, and cover more ground in search of hungry walleye.
Finally, you can also use a bottom bouncer from shore, which is great if you want to fish a nightcrawler on a crawler harness.
You can cast that out from shore with a bottom bouncer, followed by slowly retrieving it with regular bottom contact. But keep in mind that you need to use a slightly shorter leader that’s under 2 feet, to enable you to cast the rig effectively.
Walleye rigs for river fishing
The best rigs for walleye river fishing are the lindy rig, the 3 way rig, and the slip bobber rig.
When fishing for walleye in rivers, it’s key to maintain bottom contact with your walleye fishing line setup at all times. Unfortunately this means getting your tackle snagged on bottom structure a lot.
One way to avoid this is by fishing with a stationary rod. You can do this by using a 3 way rig or a lindy rig, and baiting the hook with live bait. Just cast it out in a promising spot, and wait for walleyes to find your bait.
Another option is to use a slip bobber rig, and setting the depth to just above the bottom. If there’s a current, you can cast it upstream, and then let the current slowly carry it downstream, and thereby cover more ground.
Final remarks
This wraps up our article on rigging for walleye, and hopefully you found the right walleye rig setup for your purposes.
One last tip: if you tie your rigs in advance (which you should), a great way to store them is by wrapping them around a pool noodle.
Start by cutting a pool noodle into smaller pieces. Then embed the hook of your rig into the foam, and wrap the line around the pool noodle fragment, and tuck the end of the line in.