Float And Fly Rig 101 (How, When and Where)
UPDATED 03 NOVEMBER 2023
by Robert Ceran
One of my favorite finesse techniques is Float and Fly fishing, which I love to use while drifting over brush and looking for suspended fish with LiveScope.
Not only is the Float and Fly rig extremely fun to use, but it is also more effective than other setups when the bite is slow and the fish are finicky.
While finicky fish often don’t want to commit to big lures, they’ll readily eat a fly or finesse jig dangled in front of them.

In this article I’ll explain how, when and where to fish with the Float and Fly rig, in order to catch more fish and get the most out of it.
What is the Float and Fly technique?
A Float and Fly rig typically consists of a little hair jig or finesse jig under a small float, presented at the right depth for suspended fish that you want to target.
Originally, anglers devised this system using a fly that imitated fish fry. The Float-n-Fly fishing technique is the pinnacle of finesse presentations for small hair jigs that weigh between 1/16 and 1/8 oz.
The Float-n-Fly technique is not new; anglers have used it for around fifteen years, but during most of that time it hasn’t garnered much attention outside smallmouth bass fishing circles.
So for many years, most anglers believed this technique was a lethal presentation for suspended smallies in midwinter, but didn’t really use the Float and Fly setup for anything else.
How do you rig a Float and Fly setup?

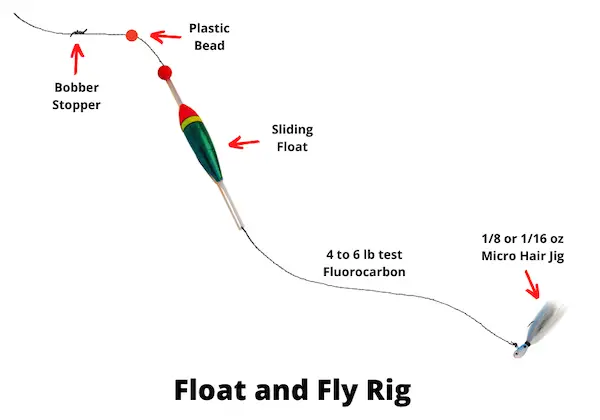
Now let’s talk about how to set up a Float and Fly rig. You’ll need the following fishing gear and tackle components for this:
- Lightweight spinning rod and reel
- Main line (4 to 6 lb test fluorocarbon or monofilament)
- Sliding float
- Bobber stopper
- Plastic bead
- 1/8 or 1/16 oz micro jig
How to set it up: Start by rigging a bobber stopper onto your main line. In most cases, your main line will be 4 to 6 lb test lightweight fluorocarbon.
I prefer fluoro over mono, since fluoro sinks while mono is naturally buoyant, and thus tends to float. This makes it harder for a lightweight micro jig to sink down fast enough if you use mono.
Most floats come with bobber stoppers, but it’s always good to have extra, since you’ll need a new one on every fishing trip.
After the bobber stopper, slide a plastic bead onto your main line. This helps to protect the bobber stopper knot, and it also prevents the sliding float from sliding over the bobber stopper.
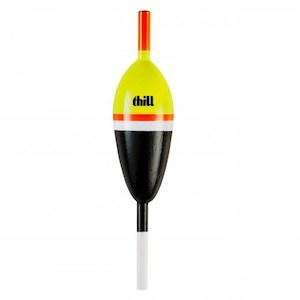
Once the bead is threaded onto your main line, thread your sliding float onto it as well. I like to use the Thill Pro Series Oval Floats, which are specially designed for use with a Float-n-fly rig, and perform well with this setup.
Finally, tie your main line to a micro hair jig with a Palomar knot or a single Uni knot. My favorite jig to use for this is a SPRO Phat Fly (shown in the image below), which is also specifically designed for Float and Fly fishing.

Choose the size of the jig depending on the size of the fish you want to target, as well as the depth. If you’re targeting bluegill, you can even downsize your jig to 1/32 oz.
You don’t need a special rod for this technique, and can use your drop shot rod for Float and Fly fishing without any problems.
What fish can you catch with a Float and Fly rig?
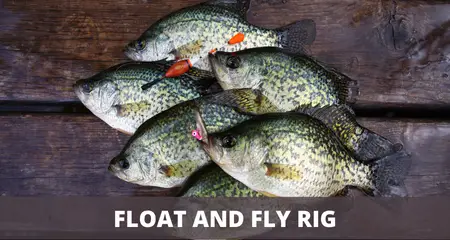
The Float-n-Fly Rig is a great smallmouth rig, but you will also catch spotted bass, crappie, bluegills, white bass, striped bass, and trout.
Unfortunately, only a few largemouth bass will strike it. However, during the winter months, even largemouth bass become more partial to finesse lures, and are caught with a Float and Fly rig more often.
The Float and Fly technique was originally developed for smallmouth bass fishing in winter, but it has more recently been successfully adapted by crappie fishermen who started using a Float and Fly setup to present their lure to deep crappie in clear lakes.
Since then, the float and fly technique has been found to work well for many other species of fish that suspend in the water column and that have a weakness for small finesse baits.
Over the past few years, we’ve discovered that the Float-n-Fly technique works well year-round in most waters, clear or muddy, and even in streams.
Everyone knows suspended fish are not particularly aggressive. Thus, you must present your bait directly in front of the fish’s mouth to get a bite.
We’ve tried jigging spoons, blade baits, and tail spinners rigged under the float, but had trouble fishing slowly enough or maintaining the right depth, and so we’ve always returned to the hair jig used in the original Float and Fly setup.
How to fish a Float and Fly rig
To use this method, cast out just past the target, wait until the hair jig sinks down and the float stands up, and then slowly wiggle the rod to cause the hair jig to move.
To use this method, start with a 1/16-oz jig in shad colors with a touch of chartreuse on overcast or sunny days, and set the depth to 8 to 9 feet.
Cast out your rig just past the target, wait until the hair jig sinks down (at which point the float stands up), and then slowly wiggle the rod to cause the hair jig to move.
When you do this, try targeting key lake points along channel breaks or bluffs while setting depth at 10 to 12 feet with 1/8oz.
When fishing with a Float and Fly rig, we discover that a small amount of water movement will benefit this presentation.
Additionally, you may elevate the rod tip to lift the bait slightly, let it settle again for some activity, reel in the line, and repeat the process all the way back to the boat or bank.
If the float dips or sags, you’ll know it’s Fish On! Try to set the hook quickly, because fish are quick to spit out the jig if you don’t.
Avoid moving the Float-n-Fly rig too much, especially in cold water. Sometimes it’s great to do nothing but watch the float gently bobble around in the waves.
Where to use a Float and Fly rig
One of the best ways to find fish that you can target with the Float and Fly technique is to idle around with your boat and use your fish finder to find schools of fish suspended in the water.
When you do, note their depth on the sonar, and then set the depth of your float to place a hair jig in right their path.
And while you can use a Float and Fly rig all year round, it is often most effective when fish are less active in the winter.
Spring: This is one of the best times to fish with a Float and Fly setup, in coves or on flats with 8–12 feet of water.
Summer: During the summer, we will search for current and maybe slightly more discolored water, and then fish around submerged humps, rock piles, and weedlines. Usually we will set the float at a depth of around 8 feet.
Fall: This is a great time to target smallmouth bass with a Float and Fly setup. Look for them in eddies of streams.
Additional tips for Float and Fly fishing
- Experiment with baiting your hair jigs with minnows, waxies, or trout power baits.
- Watch the float while fishing close to the bottom; if it bends over sideways, your hair jig may be on the bottom, or a fish may have taken it.
- If you’re using a clip-on float, cut off the top of the float and rerig after landing several fish of a respectable size.
- Use transparent fluoro or mono lines and hot pink or chartreuse jigs if the water is muddy.
- Cast out into the current and feed out line, so the float bobs gently along a probable spot in the stream, and you will discover that this is the ideal presentation for stream smallmouth.
Finally do not assume that just because you are using little hair jigs, you’ll only catch small fish with the Float-n-Fly Rig. This approach is more adaptable than you would think.
The Float-n-Fly Rig is heaps of fun to fish, and catches all kinds of fish as you practice and build confidence.
What float is best for Float and Fly fishing?
We’ve tried a lot of slip floats over the years, but the Thill Pro Series Oval Float is the only one we’ve found to work well consistently.

Made of balsa wood, the Thill Pro Series casts farther, is wind-resistant, and lasts longer.
The body of the Thill Pro Series Oval Float is glued to the stem. Therefore, this bobber is meant to withstand years rather than just one or two fishing seasons, so its components won’t degrade over time.
Like most other bobbers, it is available in a few sizes, and is brightly colored above the water, but is black on the bottom, making it perfect for shore anglers.
