The 9 Best Rigs For Steelhead Bank Fishing
UPDATED 03 NOVEMBER 2023
by Robert Ceran
Fishing for steelhead is among the most exciting types of angling there is, and is different from many other types of fishing, as it usually involves bank fishing in rivers with medium to strong currents.
In order to catch steelhead from the bank, it’s not only essential to use the best rigs for steelhead fishing, but you also need to use them correctly, as that will enable you to present your bait at the right depth and speed to trigger bites from steelhead.
In this article we’ll cover the best rigs for steelhead fishing from the bank, and will discuss their advantages, how to tie each of them, and how to use them correctly.
How do you rig for steelhead bank fishing?
The 9 best steelhead rigs for bank fishing are:
- Bead rig
- Worm rig
- Slip bobber rig
- Bobber doggin rig
- Plunking rig
- Spinner rig
- Wacky worm rig
- Bobber and jig rig
- Bottom bouncing rig
While all of these rigs are great options to catch steelhead from the bank, each of them is designed for different water conditions, different baits, and different tactics.
So, depending on your specific purposes, you won’t need to use all of the steelhead rigs for bank fishing listed above (and definitely not all of them at once).
Instead should aim to test a couple that are most appealing to you, and then build up your experience as a steelhead angler from there.
Now let’s dive into the details and take a closer look at each of these steelhead rigs for bank fishing, and how to use them.
Bead rig for steelhead
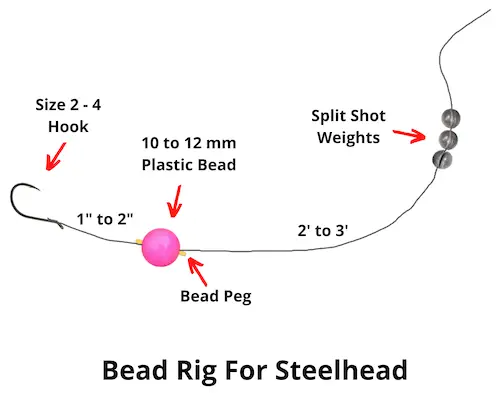
Plastic beads are among the most effective baits for steelhead, since they resemble salmon eggs that make up an important part of their natural diet.
How to tie it: There are several ways to tie a bead rig, but the easiest is to use beads that come with their own bead pegs that you can use to fix them on the line.
Start with a 10 or 12 mm plastic bead, and thread your leader line through it. Then tie a size 4 to 8 octopus hook to the end of the line.
Position the bead on the line about 1 inch above the hook, and fix it to the line by inserting the bead peg into the bead.
When to use it: The bead rig for steelhead is a great option to use whenever there is enough current to move it along the river. This rig is so effective because it looks very similar to a real salmon egg drifting downstream with the current.
How to use it: The best way to fish a plastic bead is with a float fishing rig set up (such as the bobber doggin rig or the slip bobber rig), utilizing the bobber to drift the bead rig downstream with the current.
When doing this, it’s important to set the depth of the bobber sufficiently deep, so your bead has direct contact with the bottom as it drifts along, which is exactly how a real salmon egg behaves when it is carried downstream with the current.
Steelhead worm rig
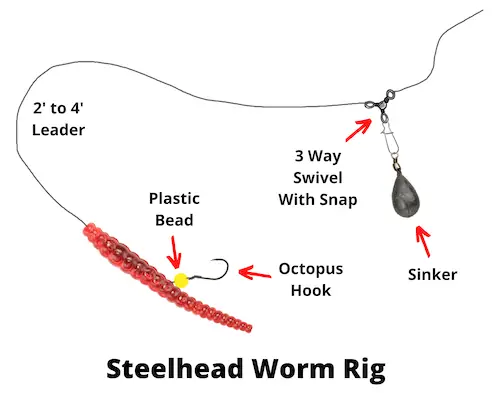
This setup is one of the best steelhead rigs for bank fishing, as it is ideal for presenting your worm close to the bottom with drift fishing for steelhead.
How to tie it: Tie your main line (50 lb test braid is great) to one eye of a three way swivel with a snap attached to one of the other eyes.
You can also use a two way swivel for this, but I like the 3 way swivel since it helps to stop the weight from getting tangled on the line.
After this, thread a 4 inch plastic worm onto your leader line (10 to 12 lb test fluoro or mono), either by using a worm threader, or with a large size 1 or 2 hook.
Next, thread a plastic bead on to the line underneath the worm, and then tie on a size 6 to 8 octopus hook. The bead prevents the worm sliding on top of the hook, which keeps it nice and straight in the water.
Finally, tie the other end of the leader to the 3 way swivel and attach a 1 to 3 oz weight to the snap, and you’re good to go.
When to use it: This is a great all around drift fishing rig that can be used in many different scenarios, and you can easily adjust the size of the weight depending on the strength of the current.
The great thing about this setup is that it will automatically present your worm close to the bottom, which is the prime strike zone for both winter steelhead and summer steelhead.
How to use it: Cast your setup slightly upstream of the river section you want to target, and then follow the drift of the weight with the tip of your rod, as the rig setup is pulled downstream by the current.
Open the bail of your reel to release more line when you reach the end of the arc, as that will prolong the drift.
Wacky worm rig for steelhead
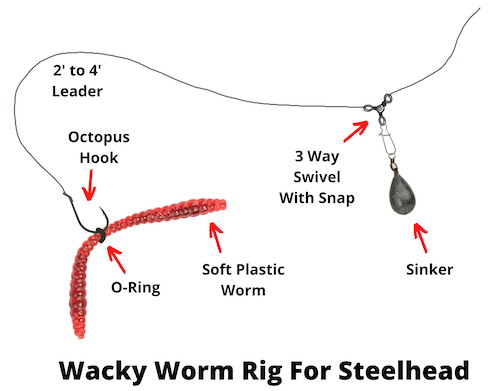
This rig is similar to the standard worm rig, but instead of threading your plastic worm onto the line, you attach the middle of the worm to the bend of your hook, resulting in a horizontal presentation of the worm.
How to tie it: The basic setup of this rig is identical to the steelhead worm rig, but instead of threading the plastic worm onto the leader line, attach a 6 inch worm to the bend of a size 6 or 8 octopus hook with an o-ring.
You want the worm to be attached to the hook in the middle, which gives both ends of the worm lots of freedom to move in the water.
When to use it: This setup can be a great option when the bite is slow, and steelhead don’t respond to regular worm presentations.
Wacky rigging gives the worm more freedom to move more naturally as it drifts in the current, and this tends to be more effective at triggering bites from finicky winter steelhead.
How to use it: The wacky worm rig should be fished exactly the same way as the regular worm rig set up, by drifting it along promising runs (though you should avoid sections that have a lot of boulders for the rig to get snagged on).
Slip bobber rig for steelhead
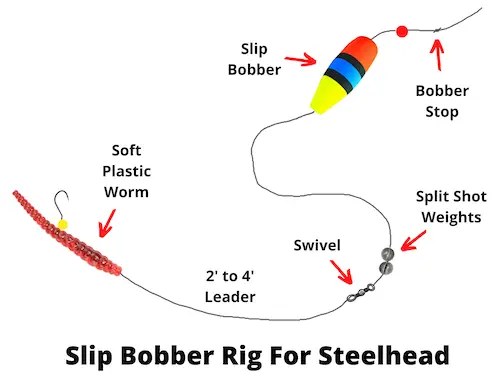
While float fishing setups are often associated with drift fishing for steelhead from a boat, they also work like gangbusters for fishing steelhead from the bank, and so should be an integral part of your arsenal of rigs to fish for steelhead from the bank.
How to tie it: While it’s possible to tie this setup with a fixed bobber, the best option is to use a slip bobber, since that allows you to target winter steelhead in water that’s more than 6 feet deep.
The first step is to tie a bobber stop on to your main line, followed by threading the line through a plastic bead (which prevents the bobber stop from getting stuck inside the slip bobber), and then threading it through the slip bobber.
Next, tie your main line to a swivel, and add one or more split shot weights above the swivel to weigh down your baited hook in the water.
Then tie a 2 to 4 foot leader (I like to use 10 to 12 lb test fluoro for this) to the swivel, and thread a plastic worm onto the other end of the leader, followed by a plastic bead. Finally tie a size 6 to 8 octopus hook to the leader underneath the bead.
When to use it: This is a great rig to use if there are a lot of boulders, sunken trees, or other cover on the bottom of the river section that you want to target, all of which tend to snag a bottom fishing setup in next to no time.
In cases like that, using a float setup allows you to drift your baited hook close to the bottom, but without constantly getting it snagged.
How to use it: Adjusts the depth of your bobber stop to the estimated depth that you want to target (which should be about 1 to 2 feet above the bottom), and then cast your rig slightly upstream, and let it drift with the current.
During the drift, it’s important to keep the line between the float and your rod tip off the water as much as possible, as that will allow the bobber to move more naturally.
Your bobber should stand up straight in the water. If you notice that it’s slanting downstream, that means your weight is dragging the bottom, and you should adjust the bobber stop to a shallower depth.
Bobber doggin rig for steelhead
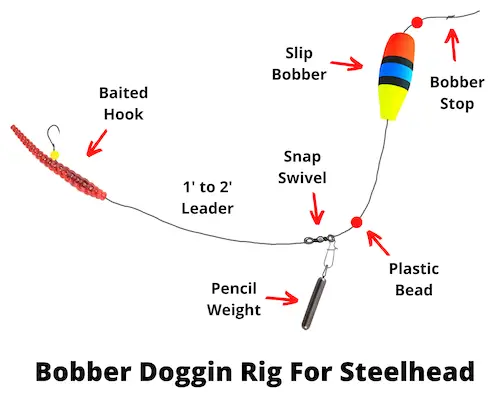
This rig combines the strengths of the classic steelhead worm rig with a slip bobber rig, and is one of the most effective steelhead rigs around, which explains why it has become so popular during recent years.
How to tie it: This is basically a hybrid rig combining the steelhead worm rig with a slip bobber rigged above the weight.
Start the same way you would with the slip bobber rig, but also thread a plastic bead underneath the bobber (to prevent it getting stuck on the swivel.
Next, tie your main line to a 3-way swivel with a snap, or to a regular snap swivel (as shown in the image above), and attach the snap to a pencil weight.
Finally, add a 1 to 3 foot long 10 to 12 lb test fluorocarbon leader with a baited hook at the end of it.
While the image above shows a threaded plastic worm, you can also use any other option (such as a hook baited with a roe sac, shrimp meat, or a plastic bead).
When to use it: This is a great option to use when there is a lot of cover on the bottom causing regular drift rigs to get snagged a lot.
A bobber doggin rig comes with the advantage that it gets snagged much less frequently, but still presents your bait in the strike zone at all times, since it drags the weight along the bottom.
How to use it: The float of the bobber doggin rig is intended to drag your weight and baited hook along the bottom, so you should set your bobber stop to more than the maximum depth you expect to encounter.
With this technique, you actually want to see the float to lean downstream as it pulls the pencil weight along the bottom (which is exactly the opposite of what you would look for with a conventional slip bobber rig).
Bobber and jig rig for steelhead
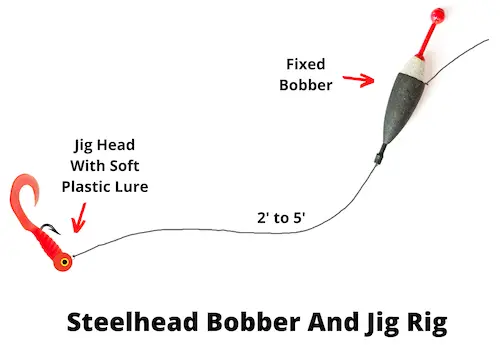
This is a very simple rig that works well in many different situations, and so is a great option to start fishing steelhead from the bank.
How to tie it: This is one of the simplest rigs to tie. If you’re using monofilament or fluorocarbon as your main line, you can tie this setup without a leader (as shown in the image above), but if you’re using braid as your main line, you should tie a leader underneath the bobber.
Start by threading a fixed bobber on to the main line, and then tie a jig head to the end of the line. Choose the weight of the jig head according to how strong the current is, but it’s a good idea to start with 1/8 to 1/4 oz and take it from there.
Next, thread a soft plastic lure onto the hook of the jig head. This is where you can experiment with a lot of different colors, lengths, and designs, to find out what the steelhead want to bite.
When to use it: If you’re using a fixed float, this setup is a great option for relatively shallow river sections that are less than about 5 feet deep. Anything deeper than that, and you’ll need to use a slip bobber instead.
How to use it: You should use the bobber and jig rig to fish for steelhead from the bank just as you would a slip bobber rig, by casting it slightly upstream and letting it drift downstream with the current.
The aim is to get your jig lure to drift close to the bottom, so you need to estimate the depth of the river, and set the depth of your bobber accordingly.
If you don’t get a bite, chances are that you’re fishing for steelhead too high in the water, and then you need to increase the depth.
But if you see the bobber leaning downstream, that means you’re dragging the jig along the bottom and then you need to set the bobber more shallow.
Spinner rig for steelhead
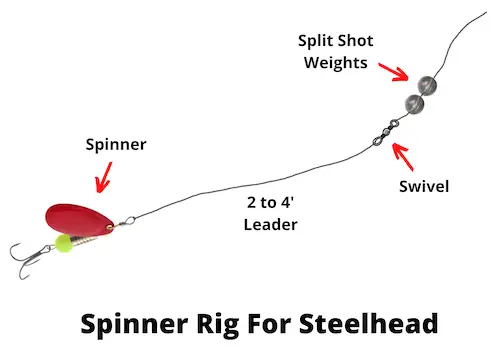
This classical setup is relatively easy to tie, but produces a lot more bites than most people assume.
The great thing about lures such as spinners and plugs is that they can trigger reaction bites even when the steelhead aren’t feeding actively, which is often the case with winter steelhead.
How to tie it: Start by tying your main line to a swivel, and then adding one or more split shot weights just above the swivel to weigh down your spinner in the water.
The number of split shots depends on the strength of the current, and on how deep the river is. Next, tie a 2 to 4 foot leader (using 10 to 12 lb test fluoro or mono) to the other eye of the swivel, and then tie your spinner on to the leader.
The swivel is essential for this rig, since the rotating blade of the spinner will otherwise create line twist, resulting in line tangles and birds nest formation.
While this rig was originally designed to be used with spinners, you can also use it with other steelhead lures, such as plugs, crankbaits, or spoons.
When to use it: This rig works well in a wide variety of different situations, but I like to use it when steelhead won’t bite on worms or other bait rigs, since I can still get reaction bites with a spinner in those cases.
How to use it: Cast your spinner rig straight across the river, and retrieve it in an arc as the current swings it downstream. Aim to keep the spinner as close to the bottom as possible, without getting it snagged.
Also, try to slow down the retrieve speed as much as possible, since the current is usually enough to trigger rotation of the spinner blade, and you can keep the spinner in the strike zone longer with a slow retrieve.
Plunking rig for steelhead
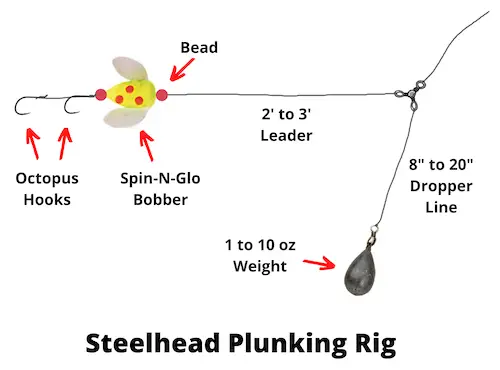
This is the only rig in this article which isn’t a drift rig, and is fished as a stationary rig, waiting for steelhead to come by and eat the bait. It’s usually set up with a Spin-N-Glo bobber, and hence is also referred to as a Spin-N-Glo rig.
How to tie it: Tie your main line (50 lb test braided line) to a three way swivel, and then tie a 8 to 20 inch long monofilament dropper line to one of the other eyes on the swivel.
The dropper should be at least 10 lb test weaker than the main line (which allows you to break it off if the weight gets snagged). Then tie a 1 to 10 oz weight to the other end of the dropper line.
Now tie a 2 to 3 foot long 20 to 30 lb test fluorocarbon leader to the 3rd eye of the swivel, and thread the other end of the leader through a Spin-N-Glo bobber, with a plastic bead above and below.
Finally, tie two octopus hooks about two inches apart at the end of the leader.
If you don’t want to tie all of this yourself, you can also get pre-tied Spin-N-Glo leader setups that you can tie directly to the swivel and be done with it.
When to use it: The plunking rig is a great option to use during winter and spring after high water.
It works best in relatively strong current, when other rigs are much harder to fish with, and the great thing about using it is that you can set up several rods in parallel, increasing your odds of catching fish.
By the way, the plunking rig also makes a great salmon river fishing setup.
How to use it: When you deploy this rig after a high water period on the river, it’s best to find fishing spots close to shore that steelhead migrate along on their journey upstream.
Cast out your plunking rig in this kind of location, and then set up your rod in a rod holder, with the reel drag loosened, so a steelhead can pull off line.
While you can fish the Spin-N-Glo rig without any additional bait, it’s usually best to add a roe sac, nightcrawler, or shrimp to the hooks, as that will help to get more bites.
Bottom bouncing rig for steelhead
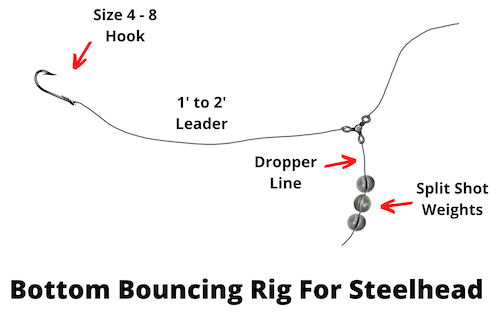
This rig is great for drift fishing for steelhead along the bottom, and comes with the advantage that it behaves better with respect to getting snagged on the bottom.
If the split shots get snagged, they are designed to slide off the dropper line, and can be easily replaced.
How to tie it: Start by tying your main line to a 3-way swivel, and then tie a 6 to 8 inch dropper line to one of the other eyes of the swivel. The dropper line should be at least 10 lb test weaker than your main line.
Next attach two or three large split shot weights to the end of the dropper line. Finally, add a 1 to 2 foot long leader to the 3rd eye of the 3-way swivel, and tie a size 4 to 8 octopus hook to the end of the leader.
When to use it: This rig is most often used for drift fishing steelhead from the bank in the great lakes region, but works well in any situation where you can use a bottom fishing rig for drift fishing.
Since you can downsize the split shot weights it also works in relatively slow current, and it is less problematic when it comes to getting snagged, as the split shot weights easily slide off the dropper line.
How to use it: The basic technique of using this drift fishing rig is similar to the worm rig described above.
But the hardest part is learning how to detect the subtle bites of steelhead, which most beginners tend to miss.
So if you’re a beginner, it’s better not to start with this rig, since a float fishing rig is better at alerting you to steelhead bites unequivocally.
Final remarks
This wraps up our article on the best steelhead rigs for bank fishing.
If you’re a beginner, looking at all of these different setups is probably confusing for you, but in that case we recommend starting as simple as possible, and then gradually adding more complex fishing rigs as you gain experience as a steelhead angler.
The simplest rig to start with on shallow rivers is the fixed bobber rig, which you can combine with a jig, worm, plastic bead, or a hook baited with salmon eggs or shrimps (which all resemble the natural food of steelhead).
While very simple, this setup works like gangbusters (especially for summer steelhead, but even for winter steelhead).
On deeper rivers the best option to start with is the slip bobber rig, which you can combine with any of the same lures or baits.
