Dipsy Diver Rig 101 (Setup and How-to Guide with Pictures)
PUBLISHED 29 JULY 2023
by Robert Ceran
Are you planning to use a dipsy diver rig for salmon or walleye trolling, but not sure how to set it up correctly and fish it for the best results?
While the dipsy diver rig is one of the best trolling setups for salmon and walleye in deep water, it requires a little know-how to use correctly.
In this article I’ll show you how to rig a dipsy diver for trolling, as well as the most important variation of this setup, and how to fish both of them for maximum success.

What is a dipsy diver rig (and what is it good for)?
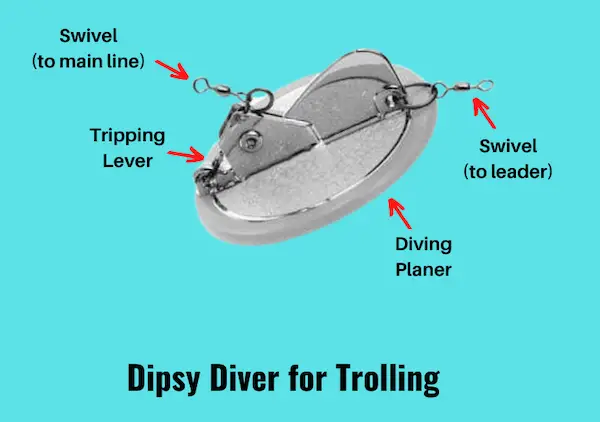
The dipsy diver rig is a trolling setup that uses a diving planer to help a trolling lure reach depths of up to 100 feet, in order to target salmon, walleye, or lake trout in deep lakes.
Dipsy diver setups are most often used for trolling on the Great Lakes (most notably Lake Erie and Lake Ontario), but also come in handy on other large lakes that are deeper than 50 feet.
Dipsy divers have 4 different settings that control the angle at which they plane sidewards, similar to planer boards. This setting also affects how deep they dive. At a lower setting, they dive more vertically (and hence deeper), while at a higher setting, they dive more laterally (and hence shallower).
Also, since you can set each diver to plane sideways at different angles from your boat, this allows you to spread out your trolling lines and thus avoid getting them tangled.
Dipsy diver rig components
Here are the tackle components you’ll need to rig a dipsy diver setup:
- Dipsy diver (Luhr Jensen)
- 30 to 50 lb test monofilament main line
- 12 to 20 lb test monofilament leader
- Snap swivel
- Plastic bead
- Dodger (optional)
There are two main ways to rig this setup. You can either rig a trolling lure directly to your dipsy diver via a long leader, or you can rig a dodger in between the dipsy diver and your trolling lure.
I’ll show you both of these setups below, and will also cover what they are good for.
Also note that some anglers prefer to use braid as their main line, since it has less stretch, which can help the performance of the dipsy diver in the water, and also helps you to sense bites, and when the mechanism has been tripped.
However, the depth chart provided by the manufacturer only applies to monofilament main line, and so if you opt for braid, you’ll have to figure out how to create your own depth chart.
How to rig a dipsy diver setup
Let’s start with the basic setup, and then take a look at the version with a dodger rigged on the leader.
Simple dipsy diver rig
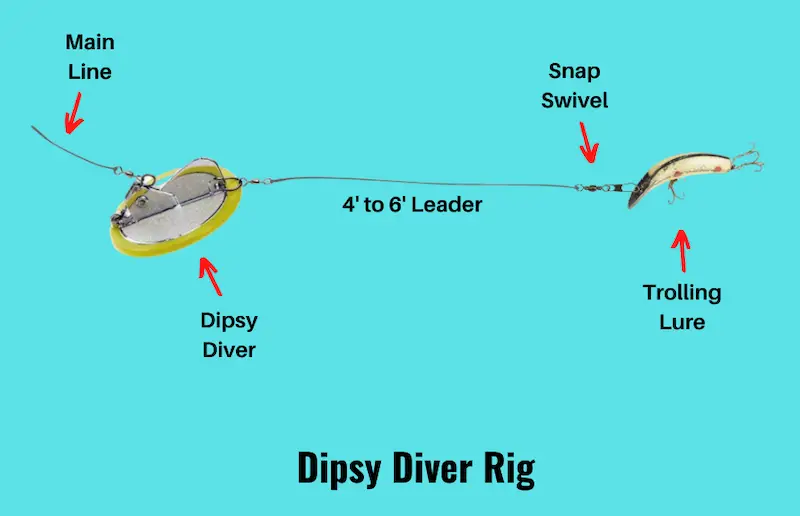
Start by threading a large plastic bead onto your main line, and then tie it to a snap swivel. The plastic bead stops your dipsy diver from getting stuck on the uppermost line guide at the tip of your rod.
Next, push the trip mechanism into place on the front end of the dipsy diver, followed by attaching the snap swivel that you tied to your main line in step 1 to the swivel on the trip mechanism.
Next, tie your monofilament leader to the swivel at its back end, followed by measuring out about 4 to 6 feet of mono leader line, and then tie this to another snap swivel. The snap swivel attached to the end of your leader now allows you to easily swap out various trolling lures.
Finally, attach your trolling lure, which is most often a spoon or crankbait, and you’re good to go!
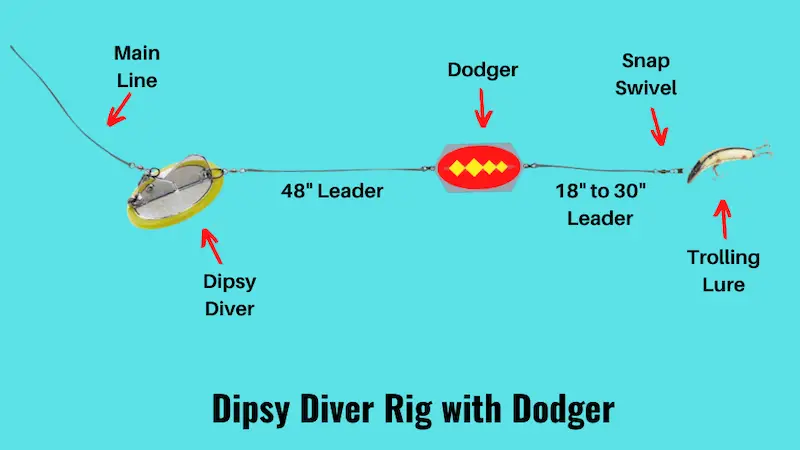
Dipsy diver rig with dodger
In my experience, the basic dipsy diver setup is good enough for most purposes, and will put plenty of fish in your boat. But some anglers like to use a modified dipsy diver setup that incorporates a dodger rigged along the leader line.
In order to set this up, start the same as with the basic setup, but after you tie your leader line to the swivel at the back end, only measure out about 48 inches of leader, and tie the other end to a dodger.
Next, tie a second leader to the other end of the dodger, and measure out about 20 to 30 inches before tying it to a snap swivel.
The advantage of this setup is that the dodger kicks and wobbles when it is trolled through the water, which creates vibrations that are highly attractive to lake trout and other fish. The movement of the dodger also gives your trolling lure additional action.
If you want to use this setup with a fly or salmon hoochie setup as your trolling lure, it’s better to shorten your leader length to about 12 to 18 inches, as this works better for giving the fly action in the water.
Finally, you can also use a flasher rigged on your leader instead of a dodger, and a popular model used for this purpose is the Mini Spin Doctor Flasher, which is 6 inches long.
How to troll a dipsy diver setup
The best way to fish a dipsy diver setup is to troll it with a line counter reel.
Doing that allows you to estimate the depth at which your lure is running, based on the setting of your diver, the amount of line you release, and the speed at which you’re trolling.
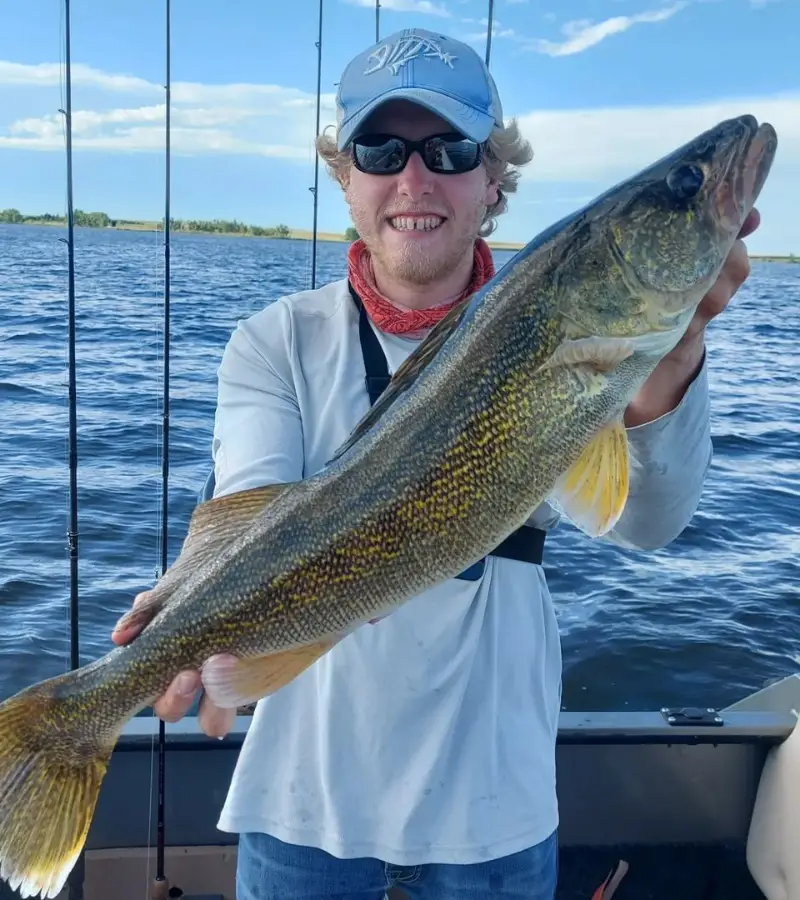
Image source: instagram/@hoghookerfishing
The trolling speed recommended for dipsy divers by Luhr Jensen is between 2.5 and 3.0 mph, and at this speed you can use their dipsy diver depth chart to figure out how deep your lure is running.
This speed works well for king salmon, while it’s a little too fast for walleye. But keep in mind that if you adjust your trolling speed, you also need to adjust the depths of the chart by about 10% for every mph that you troll slower or faster.
As a final word of advice, don’t rely 100% on the depth chart provided by Luhr Jensen, and instead try to figure out your own depth settings based on trial and error.
For example, when you hit the bottom with your trolling rig, make a note of your trolling speed and the amount of line you had released from your line counter reel, and use this for future reference. That way you can slowly build up your own depth chart, which is going to be much more accurate.