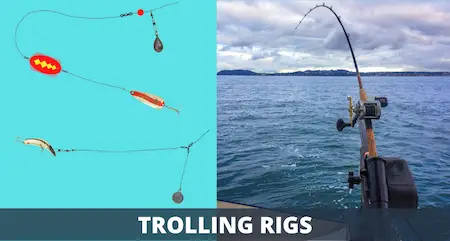
13 Types Of Trolling Rigs (That Catch Fish Anywhere)
PUBLISHED 26 JULY 2023
by Robert Ceran
Are you planning to do some trolling, but not sure which trolling rig is best for your purposes?
In order to leverage the full power of trolling to put more fish in your boat, it’s essential to use the right trolling setup for fish species and the depth range that you want to target.
In this article I’ll walk you through the most important trolling rigs, and will cover how to set them up, how to fish them, and how to choose the best setup for your purposes.
What are the different types of trolling rigs?
The 13 most important trolling rigs are:
- 3 way swivel rig
- Trolling rig with inline weight
- Flasher rig
- Dodger trolling rig
- Lindy rig
- Bottom bouncer rig
- Crawler harness rig
- Dipsy diver rig
- Cowbell trolling rig
- Spin-n-glo rig
- Meat rig
- Hoochie rig
- Umbrella rig
We’ll go over the strengths and weaknesses of each of these trolling rigs in full detail, so you can decide which one is best for you.
We’ll also discuss how to set them up, and how to fish them for best results. Read on below to get the full scoop.
3 way swivel rig
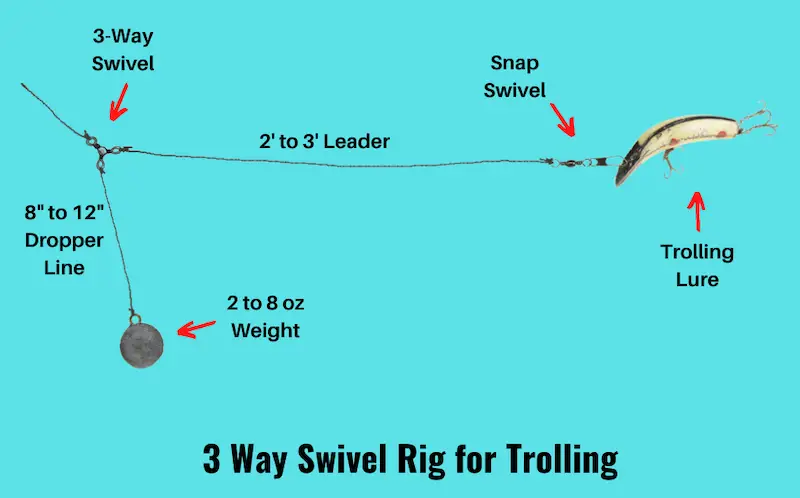
The 3 way swivel rig is one of the simplest trolling setups you can use, and is a great all around option for targeting a range of species that can be caught at medium depth.
It consists of a 3 way swivel tied to your main line, as well as a dropper line attached to a sinker, and a leader line attached to your trolling lure. All three of these lines converge on the same swivel.
Tie this rig by attaching a 60 to 80 lb test braided main line to the swivel, followed by attaching a 20 lb test mono dropper line to the second eye of the swivel. The dropper line is then tied to a 2 to 8 oz weight.
Next, tie a 2 to 5 foot leader to the third eye of the swivel, consisting of 20 to 30 lb test fluoro, and tie the end of the leader to a snap swivel, which is great for easily swapping out trolling lures.
The dropper line is weaker than the main line, and this comes with the advantage that you can tear them if your weight gets snagged on the bottom, without losing your lure.
Choose the size of the weight depending on how deep you want to fish. When trolling in freshwater, it can often be a good idea to allow your weight to make contact with the bottom while you’re trolling.
Trolling rig with inline weight
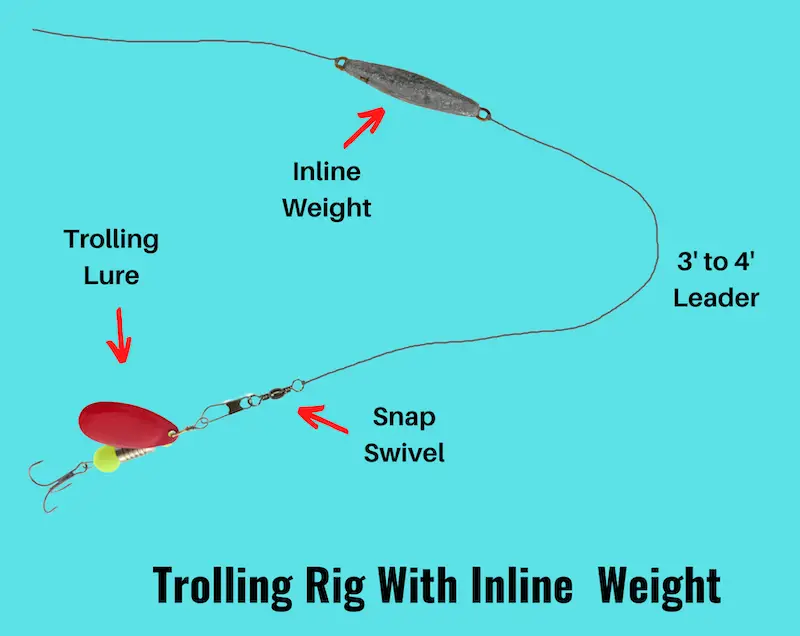
Apart from the 3 way rig, this is the simplest trolling rig that you can use (apart from tying a trolling lure directly to your main line)
This trolling rig setup works well when trolling in relatively shallow water, or when targeting fish that are feeding close to the surface.
To set up this rig, start by attaching your main line to one end of a 1 oz inline weight with swivels at both ends. Some weights have rings instead of swivels, and in that case it’s better to tie a snap swivel to your main line, and then attach that to the weight.
You’ll want to add at least one swivel to your trolling setup, in order to avoid your line getting twisted.
Next, tie a 3 to 5 foot fluoro leader to the other end of the inline weight, and in the final step tie your trolling lure to the other end of the leader.
Flasher rig
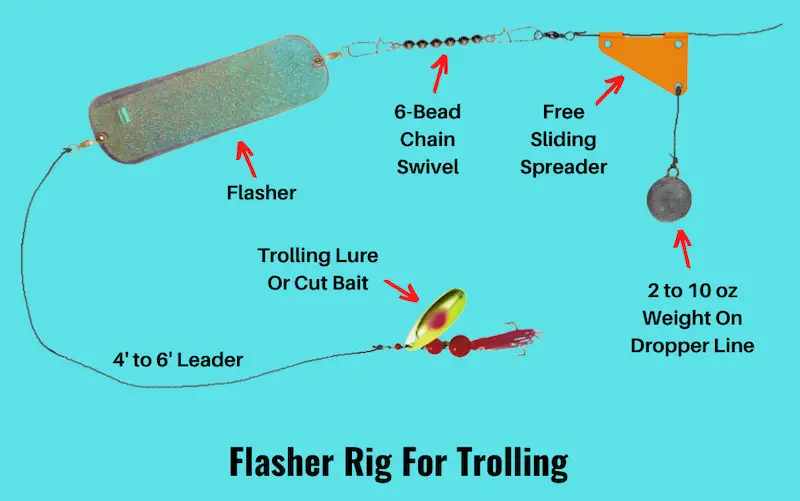
The flasher rig is most commonly used for salmon, lake trout and kokanee in freshwater, and salmon in saltwater.
If you plan to do any kind of salmon trolling, then this rig is a must have for you, as it’s one of the most effective setups for salmon (both in freshwater and saltwater).
In order to tie this rig, start by threading your 60 to 80 lb test braided main line through a spreader, and then tie it to a large barrel swivel.
Then tie a dropper line that’s between 8 and 14 inches long to the bottom hole of the spreader, followed by attaching a 3 to 10 oz weight to the other end of the dropper fishing line.
Make sure that your dropper line is weaker than the main fishing line, as that will allow you to break it off if your weight ever gets snagged.
Then attach a bead chain or rigging wire to the swivel at the end of your main line, and attach the other end to a flasher.
Instead of a flasher, you can also opt for a dodger (see below).
In the last step, tie a 4 to 6 foot leader line made of 20 to 30 lb test fluoro or mono to the other end of the flasher, and tie this to a snap that in turn attaches to your trolling lure.
This rig works great in water up to about 50 feet, but if you need to go deeper than that, you need to use it with a downrigger.
Finally, you can also troll a flasher rig using a line counter reel to measure how much line you need to let out to target specific depths.
Dodger trolling rig
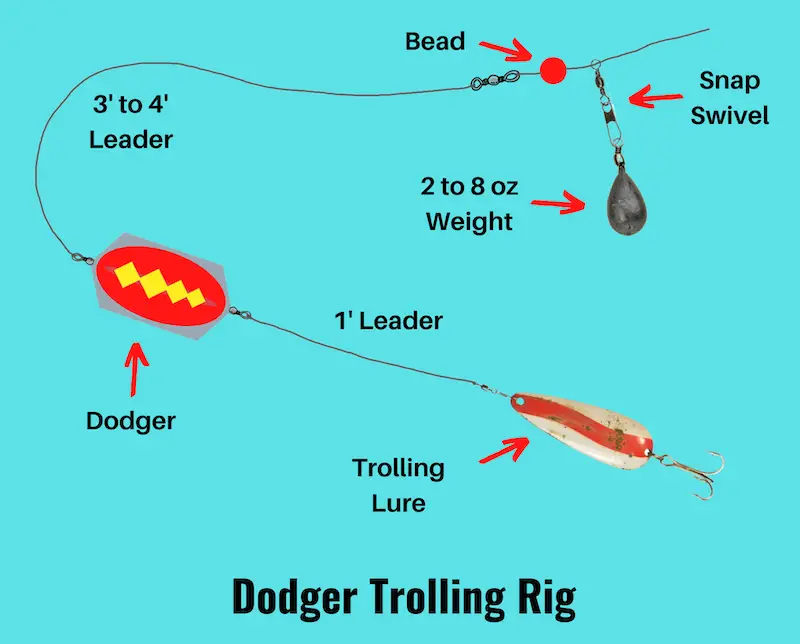
The dodger fishing rig is broadly similar to the flasher rig, but instead of a flasher it uses a dodger.
The main difference between a flasher and dodger is that a flasher is designed to rotate and spin in the water, while a dodger wobbles from side to side.
Most salmon anglers prefer flashers, while trout anglers prefer dodgers. The reason for this is that flashers are better for fast trolling speeds, while dodgers are better for slow trolling speeds.
Another difference in the dodger setup is that it doesn’t require a rudder (or spreader), since the dodger doesn’t spin in the water, and hence doesn’t cause as much line twist.
Bottom bouncer rig
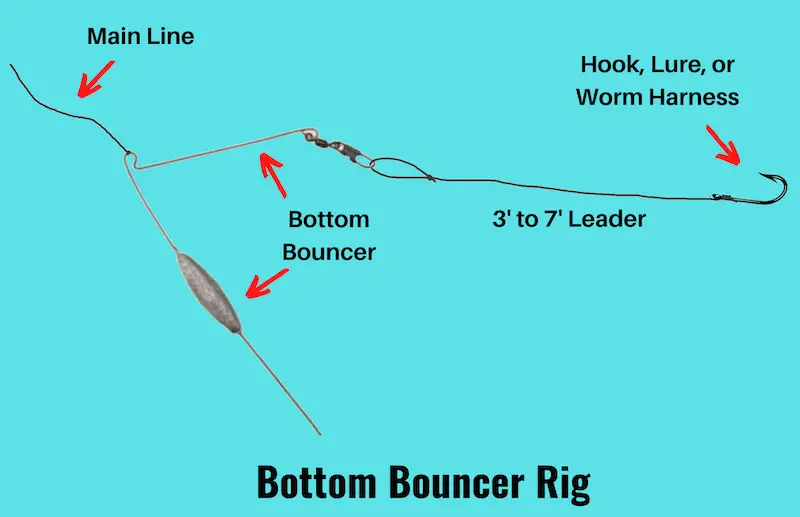
The bottom bouncer rig is one of the most popular setups for walleye trolling, and is made with an L-shaped wire with a bullet weight attached to the middle of the downwards pointing arm.
The advantage of this setup is that it literally allows you to drag or hop your bottom bouncer across the bottom without getting snagged.
To tie this rig, attach your main line to the corner of the L-shaped wire of the bottom bouncer with a palomar knot. Next, attach the leader line to the second arm of the bottom bouncer with the snap swivel.
If you tie a loop into the eye of your leader line, you can attach that directly to the snap, and exchange it easily if you want to change lure.
The great thing about a bottom bouncer is that you can troll it slowly, while making direct contact with the bottom, which puts your lure directly in the prime strike zone for walleye.
Another advantage is that you can use either with a live bait setup (using with minnows, leeches, or nightcrawlers), or with artificial trolling lures.
Lindy rig
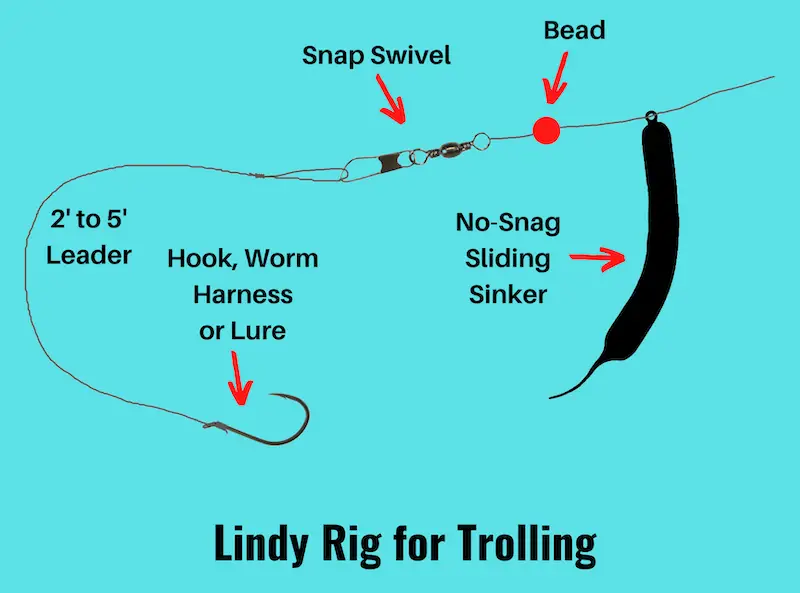
The Lindy rig is a bottom fishing rig that is most popular for walleye trolling and drift fishing, but also works well for other fish species that feed near the bottom.
It consists of a sliding Lindy weight, a bead, a swivel, and a leader line attached to your hook. In order to set it up, start by threading the main line through the Lindy sinker and then the plastic bead, followed by tying the end of the main line to a barrel swivel with a palomar knot.
Next, tie a 2 to 5 foot leader line to the other end of the swivel, and then a trolling lure, hook, or worm harness to the end of the leader.
Similar to the bottom bouncing rig, it’s best to troll a Lindy rig very slowly while making sure that you have regular contact with the bottom. This only works if you’re fishing in a location without too many rocks or other bottom cover.
Crawler harness rig
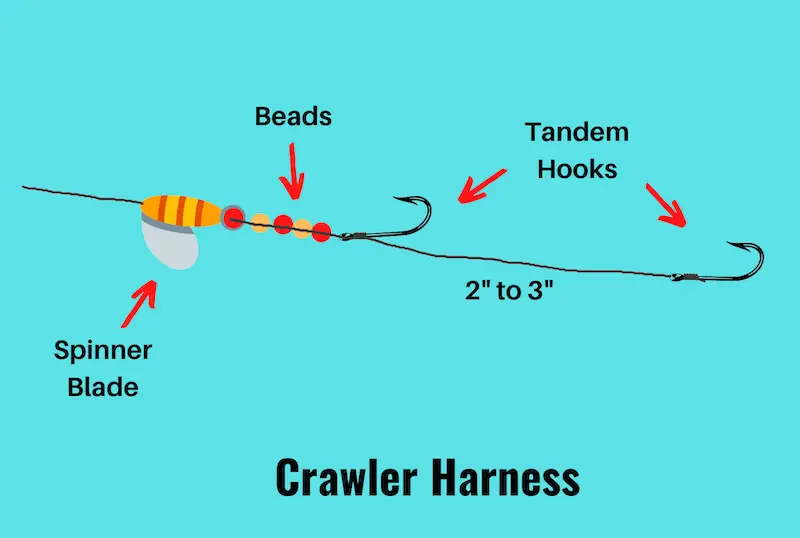
A crawler harness is a 2 hook walleye rig that is used to troll a live nightcrawler by hooking it at both ends. In addition to two hooks, it also comes with a brightly colored spinner blade at the front end of the rig.
The spinner blades rotate and flash in the water, which helps to attract curious walleye that come closer to investigate, and then discover the juicy live nightcrawler at the end of the rig.
The crawler harness rig is always used together with one of the other trolling fishing rigs described above, and is most often tied to a bottom bouncer, Lindy rig or 3 way swivel rig.
You can choose to tie your own crawler harnesses, but it’s generally easier to buy them ready-made ones from tackle shops.
Dipsy diver rig
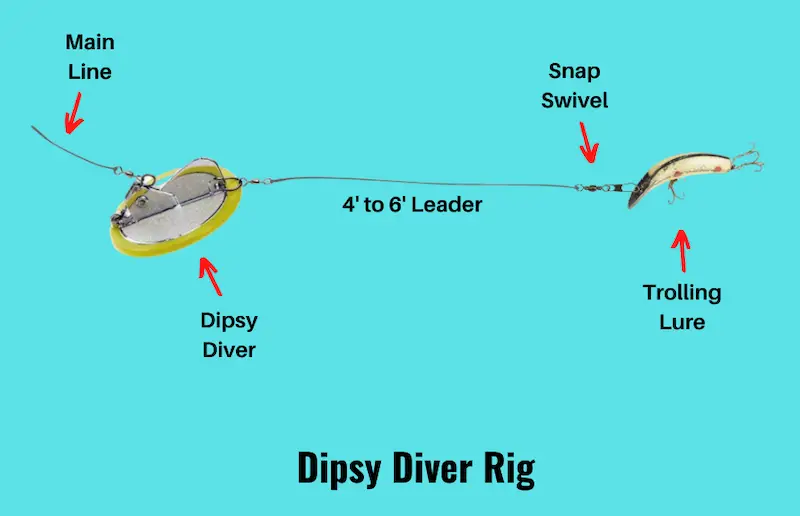
This trolling rig uses a diving planer called a dipsy diver to help your trolling lure reach depths up to 100 feet, without using heavy weights, lead core line, or downriggers.
Dipsy diver rigs are most commonly used for salmon and walleye trolling on the Great Lakes, but also work well on any large lake where fish are targeted at depths between 50 and 100 feet.
This rig is set up by tying the main fishing line to the tripping mechanism of the dipsy diver, followed by tying a 4 to 6 foot leader to the other end of the diver, and then attaching a trolling lure to the end of the leader.
A popular variation of this rig uses a dodger or flasher rigged between the dipsy diver and the trolling lure, which serves to attract salmon or lake trout.
Cowbell trolling rig
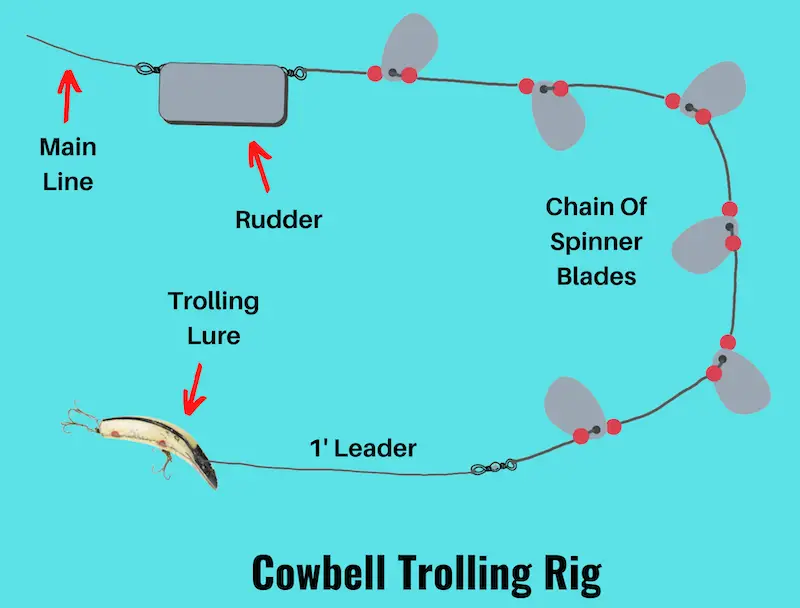
The Cowbell trolling rig has been around for a long time, and still works well as an attractor setup for lake trout and salmon.
This rig is made with a metal wire that has anywhere between 4 to 10 spinner blades rigged to it. Since this is a complex rig, it’s best to buy a pre-tied cowbell setup.
The cowbell rig has a rudder at the top end, which helps to stop line twist from being passed from the wire to your main line.
The bottom end of the wire has a snap swivel, which is tied to a 1 to 2 foot leader with a trolling lure tied to the end of it.
A key advantage of the cowbell trolling rig is that it creates a lot of commotion in the water, which helps to cover a lot of water in search of lake trout or kokanee.
Since these fish are usually targeted in deep water, the cowbell rig is most often used with downriggers to get it deep enough in the water column.
Spin-n-glo rig
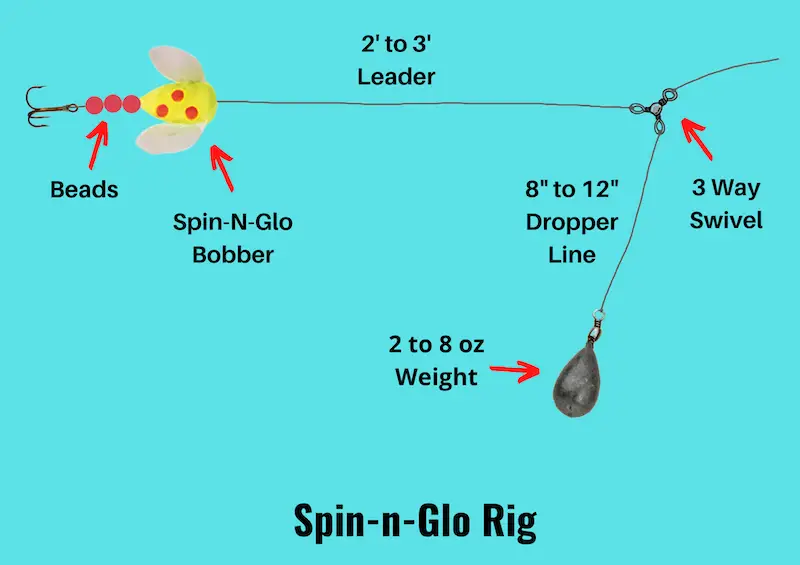
The Spin-n-glo rig is another great trolling rig for lake trout and other salmonids in deep water.
It is most often used with a downrigger or with lead core trolling line, which allows it to get down deep enough.
The spin-n-glo bobber is threaded onto the end of the leader line, followed by 2 to 4 plastic beads, and then a size 2 to 4 treble hook. If you’re trolling in relatively shallow water up to about 30 feet, you can also use the spin-n-glo-bobber with a 3 way swivel rig.
Meat rig
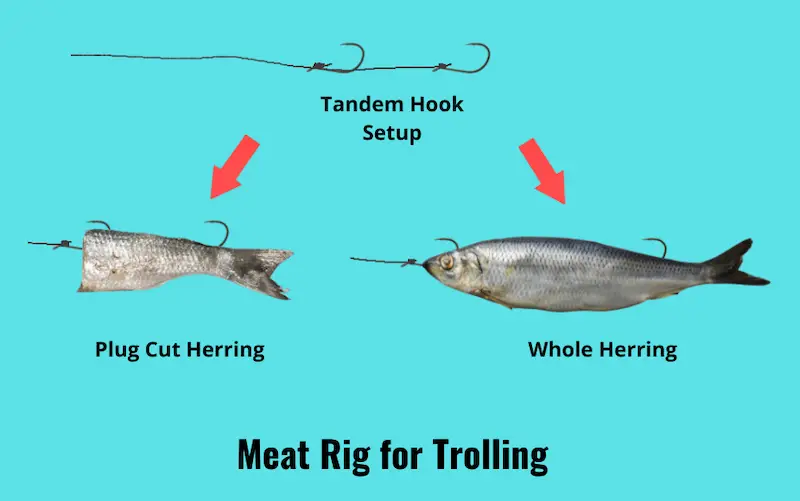
The meat rig is a tandem hook setup that is used to fish a cut plug herring or a whole intact herring for salmon.
To tie this rig, start by tying a 2 hook snell knot, giving you 2 snelled hooks rigged in tandem at the end of the leader. It’s important to choose the space between the two hooks so that it corresponds to the size of the baitfish you want to use.
It’s also possible to tie the upper hook with an adjustable knot, which enables you to move the hook up or down on the line.
The best way to use this setup is with a flasher rig. This allows you to attract salmon with the flasher, which will then come in closer and eat your bait fish.
Hoochie rig
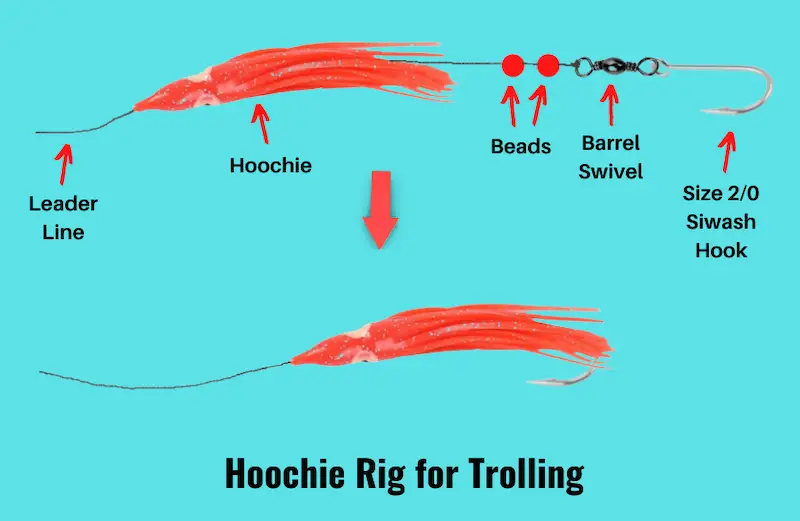
The hoochie rig is another setup that’s often used for salmon, but also works for other fish, including halibut and rockfish. Similar to the meat rig, it is most often rigged behind a flasher, and works to seal the deal when a salmon comes closer to investigate.
In order to tie this rig, start by threading a hoochie (which resembles a small colorful squid) onto a 20 to 30 lb test monofilament leader line, followed by 2 or 3 plastic beads. Then tie on a barrel swivel with a size 2/0 siwash hook attached to the second eye of the swivel.
The number of plastic beads rigged between the hoochie and the swivel determines how far back the hook is located on the rig, and it’s better to keep this as far at the back as possible, to make sure you avoid short strikes.
When you’re done, you can tie the hoochie rig at the business end of a 3 way rig or a flasher rig, and you can even combine it with a Spin-n-glo bobber rigged in front of the hoochie.
Umbrella rig
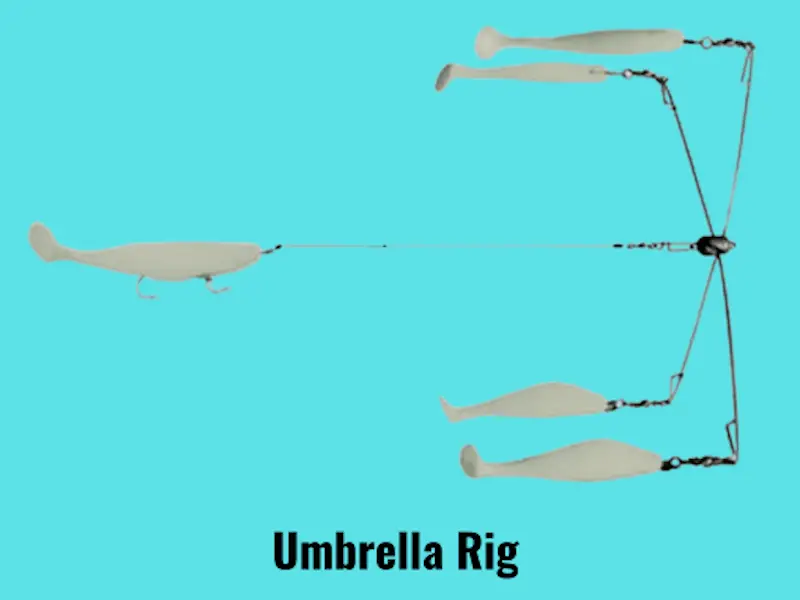
The umbrella rig is one of the best trolling rigs for striped bass, and works so well because it imitates a small group of baitfish that are being chased by a larger fish.
Umbrella rigs are among the setups that are better to buy ready-made, as their setup is relatively complex. However, if you do want to make your own version of this rig, you can do so with a four-arm umbrella made of stainless steel, and soft plastic shad imitation lures.
The best way to troll the umbrella rig for stripers is with a relatively light 2 – 4 oz. inline sinker rigged in front of it, and present it in the middle of the water column or close to the surface, depending on how deep the stripers are holding.