How To Read A Fishfinder – Learn To Identify Fish Reliably
UPDATED 17 MAY 2023
by Robert Ceran
Fish finder technology is great for identifying underwater topography and locating promising fish grounds, such as drop offs or underwater structures such as mounds, sunken trees, or even wrecks.
In addition, it also enables identifying schools of fish, or individual fish, with great precision.
However, a common challenge that most beginners struggle with is understanding how to read the screen of a fish finder correctly.
Here we’ll show you exactly how to read a fishfinder, and interpret the results to improve the success of your fishing.
Fish finder basics
The first thing you need to understand about fish finders is that they use sonar technology to yield detailed information about what is underneath your boat or kayak.
Fish finder technology is based on sending and receiving sonar signals.

The transducer of a fish finder sends sonar signals (referred to as a sonar cone) down into the water.
When those sonar signals hit an object, they are cast back upwards, and the receiver of the fish finder then interprets the returned signals, and displays them as shapes on the screen.
For more details on this you can read our article on how fish finders work.
In most cases, the sonar beam of a fish finder is relatively narrow, which means you’ll only be able to see what is pretty much directly underneath your vessel.
However, once you understand how to apply this to maximum effect, this information is enough to give you a huge edge in spotting great fishing opportunities.
It’s important to remember that fish finder sonar can only work in water, but not in air.
And once you know how to read your fish finder, you’ll know exactly how deep the water is under your boat, the temperature of the water, what structures are underneath you, and where fish are located.
In addition, you’ll even be able to estimate the size of the fish.
How do you read a fishfinder screen?
Fish Arches vs. Fish Dots
On 2D sonar fish finders (which includes CHIRP fish finders, see below for more details), fish usually show up as arches with their apex pointing upwards on the screen.
This arching effect is caused by the fact that the fish are in motion, moving through the sonar cone, and casting back a slightly different signal based on where in the cone the sonar signal hits them.
On down imaging fish finders, fish usually show up as dots, and not as arches. This is due to the fact that down imaging sonar uses a much more narrow sonar cone, and thus shows only a small section of what’s directly underneath your boat.
Once you get used to recognizing fish arches or dots on your fish finder, you’ll be able to identify schools of fish, or even a single fish, with a high level of accuracy. You’ll even be able to spot your lure in the water, plus if there are any fish close to it.
The bigger the arches on a fish finder, the bigger the size of the fish (though keep in mind that the range setting of your fish finder will also affect the size of the arches).
With a little practice, you’ll be able to estimate the size of the fish you see on your fish finder screen.
And, with more practice, you’ll learn to distinguish between the signals that correspond to fish, and the signals that result from other underwater objects such as plants and rocks.
Fish Icons
Some fish finders have what is called Fish-ID technology, which means the fish finder will automatically convert the sonar signals into fish ID icons on its display screen, which makes it easier for the user to identify them as fish.
While this sounds great in theory, the problem is that sometimes the technology isn’t 100% accurate, which means the fish finder will label some objects as fish that aren’t actually fish, while it will miss other signals that are fish.
With a little practice, you’ll get better than the fish-ID technology at telling the difference between fish and other objects on your fish finder screen.
Because of this, many experienced anglers prefer looking at arches rather than fish icons.
And with a little experience in interpreting fish arches, you too will be able to tell fish arches apart from other objects more accurately than the fish ID technology.
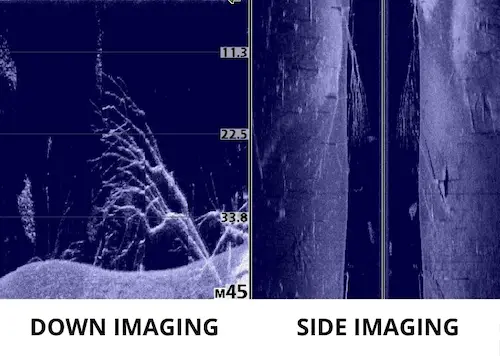
How to read down imaging vs. side imaging signals
Down imaging uses a very narrow sonar cone that is sent vertically down in the water. This makes down imaging great for viewing what’s right under your boat in great detail.
Side imaging, on the other hand, uses two sonar cones that are are sent sideways to the left and right of your boat.
As a result it helps you to get an overview of the general underwater topography on either side of your boat.
As a rule of thumb, use side imaging to scout out promising features of the underwater terrain, and then switch to down imaging when you want to identify fish in a specific location.
How to estimate fish size with a fish finder
In general, a bigger arch or dot signifies a bigger fish. However, there is more information to be gleaned from the arches, based on their shape, and how thick and wide they are.
Most fish finders show you the width of each arch, and you can use this to estimate the length of the fish.
In addition to the width, the shape of an arch is also important. A big fish will show up on the screen as a full, thick arch with a well defined curve, while smaller fish show up as partial arches that are not as thick, and not as curved.
If you’re looking at a school of small fish, they won’t show up as arches, but more like dots or short lines.
The best way to identify them as fish is based on the fact that they form a ‘cloud’ hanging in the water.
This behavior also helps to distinguish them from larger fish, such as bass, which are either solitary, or form small groups with plenty of space between individuals.
Ideally, you’ll be able to identify a school of bait fish suspended in the water, and several larger predators underneath them, which could be a great place to cast your lure.
With a little practice, you can focus your fishing activity on the largest fish, by dropping your lure close to them.
If you want to learn how to read a fish finder with CHIRP sonar, check out article on how to read CHIRP sonar.
How to read underwater topography on a fish finder screen
In addition to identifying fish, it’s also important to learn how to make use of the depth finder feature of your fish finder.
On most fish finders, the depth (either in feet or meters) between the bottom and the surface of the water is shown in the top left hand corner of the display.
Right underneath the depth, the temperature of the water is usually shown.
In addition, the display of a fish finder also gives you information about the bottom structure & consistency under your fishing kayak or boat.
You can use this to great advantage by slowly moving across an area to identify prominent structures, such as a drop off or a sunken log, which tend to attract a lot of fish.
In order to get a general overview of the underwater topography of an area, you can set your fish finder to the wide beam setting, but if you want to get a more detailed view of a specific location, it’s best to change the scan setting to narrow beam.
This will generate a very detailed image of a promising spot, plus the fish located in it. Underwater weeds show up as thin vertical lines on a fish finder screen.
Also, you should look for holes, or depressions, since these can hold lurking fish, as well as logs and underwater mounds, which also tend to attract fish.
Different types of bottom consistency
With a little practice, you can tell a lot about the consistency of the bottom based on the sonar signal.
A hard bottom will show up as a stronger, thicker line, compared to a muddy bottom, which looks broader and more “fuzzy” on a 2D sonar fish finder screen.
How to read an ice fishing flasher
If you’re into ice fishing, you’ll probably want to use a flasher fish finder, which is specifically designed for this purpose.
In contrast to regular fish finders, it displays a one dimensional read out from the water column underneath your ice hole (for more details on this, take a look at our review on the top flashers for ice fishing, and how they work).
On a side note, you can also use a regular depth finder for ice fishing (though it can be a pain to position the transducer correctly), and you can even use it to shoot sonar straight through the ice without drilling a hole.
How to read a Garmin fish finder
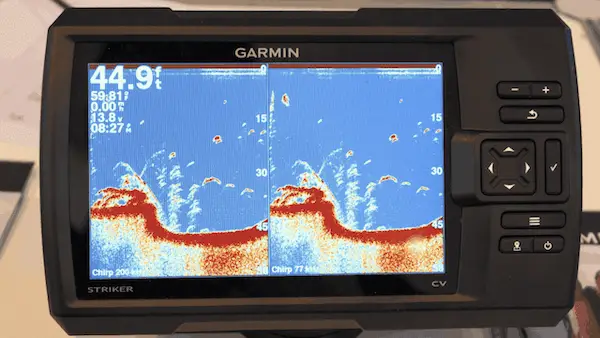
Garmin fish finders are among the most reliable and widely used brands used by beginners and experienced anglers alike.
In the case of the Garmin echo series, the sonar cone is displayed on the right hand side of the screen.
This corresponds to the column of water right underneath your boat, and will show a live signal of what is currently detected there.
To the left of this is the 2D sonar map, which shows you what was located in the sonar cone a while ago.
The colour display has a colour code, with the strongest signals showing up in yellow, while progressively weaker signals are shown in blue and red. Fish show up as arches on the screen.
If you’d like to see more details of the features of a high end Garmin model, take a loot at our Garmin Striker 7SV review.
How to read a Lowrance fish finder
Lowrance is another very popular fish finder brand that has a lot of advantages to offer.
One of the biggest advantages is that the Lowrance HDI transducer allows both 2D sonar and down imaging at the same time.
That way you can select a split screen function, which shows the sonar image on the left hand side of the screen, and the down imaging on the right hand side.
Each type of imaging has its own advantages. 2D sonar imaging is great for getting a general overview of an area, while down imaging is better at getting more detailed information on specific objects and fish, with a higher resolution.
The Lowrance sonar display is also colour coded, with yellow and red corresponding to the strongest signal. In other words, if the receiver returns a stronger signal, the display will show this as bright yellow and red, while weaker signals show up as blue or grey.
If you’re interested to learn more about the features offered by a high end Lowrance, take a look at our review comparing Lowrance HDS and Elite series.
Final remarks
This concludes our article on how to read a fish finder. If you’re thinking about getting a new fish finder, check our our reviews on the best fish finders under 300 dollars.